Framer Form File Upload with FormsPlugin (No-Code)
Discover how FormsPlugin transforms basic Framer forms into complete workflows with built-in file uploads. This guide explains why the File Upload field is essential, how to add and style it visually inside Framer, set limits and validation, connect submissions to real-world tools, and design smoother, higher-converting forms - all without writing code.
10
min

Introduction: Why File Uploads Are a Game Changer For Framer Forms
A Framer form used to be simple. Name, email, a short message, and that was it. Now those same forms handle job applications, client intake, bug reports, and creative submissions. That shift is exactly where framer form file upload becomes the missing piece between a basic contact form and a real workflow.
When a form cannot accept files, the cracks show quickly. Designers end up asking people to “email your resume,” agencies chase brand assets over messy threads, and founders bounce between Notion, Drive, and inboxes just to collect what should have arrived with the original submission. It wastes time, adds friction, and feels unprofessional on projects that otherwise look polished.
Most people typing “framer form file upload” into search are not looking for a complex dev stack. They want a native-feeling, no-code way to let someone upload a resume, a PDF brief, or a few screenshots right inside a Framer form. No scripts, no external form builder, no brittle embed.
FormsPlugin exists for that exact reason. It is a Framer-first plugin that drops an advanced File Upload field (plus 20+ other powerful fields) directly into the editor, so file handling lives where the rest of the design lives. By the end of this guide, any Framer designer, no-code builder, agency, or founder will know how to add file uploads to a Framer form with FormsPlugin, style it, connect it to real workflows, and use best practices that keep conversions high—without writing a single line of code.
“Good forms don’t just collect data; they organize work.”
— Adapted from common UX form design principles
What Is FormsPlugin And How Does It Solve Framer Form File Uploads?
Framer’s native forms are a solid start but they are still basic. Out of the box, you get simple fields like text, email, and textarea, plus a way to send that data somewhere. What you do not get is a built-in way to accept files, media, or signatures. For anyone working on real client projects or serious startup funnels, that gap shows up fast.
FormsPlugin steps in as a dedicated Framer plugin built by Framer Geeks, the agency behind hundreds of production sites. It extends native forms with more than 20 advanced field types, including an Advanced File Upload field, media uploads, e-signatures, voice recording, and multiple captcha options — all available through the FramerForms: Forms Plugin by Framer Marketplace listing. Instead of bolting on an external form service, you stay fully inside Framer and upgrade the form system itself.
The experience stays completely no-code. You install FormsPlugin from the Framer Marketplace or the FormsPlugin site, then work with it like any other Framer component. On the canvas, you drag the File Upload field into your form. In the properties panel, you control allowed file types, size limits, required/optional status, and validation. There are no embeds, no iframes, and no separate builder tabs to juggle.
For agencies and startups, this matters a lot. You get an advanced framer form file upload field that is reliable enough for job applications, client asset intake, and support tickets, backed by the same team that ships Framer sites for over 200 teams worldwide. Because file upload lives inside a complete form system, you also get multi-step flows, conditional logic, spam protection, and a growing library of specialized inputs. File upload is not a hack or a workaround—it is a first-class field inside a native Framer form stack designed for real business use.
Step-By-Step: How To Add File Uploads To A Framer Form Using FormsPlugin
Adding file uploads with FormsPlugin follows the same flow as building any other Framer component. Everything happens inside the editor, on the canvas, with visual controls. If a project already has a form, FormsPlugin drops right in. If not, you can start from one of its templates and have a production-ready form running in minutes.
The steps below assume you have a Framer project ready, like a job application page, a client intake form, or a support portal. Keep that project open as you read and you can follow along, turning the idea of “framer form file upload” into a working field by the time you reach the end of this section.
Step 1: Install FormsPlugin And Choose The Right Plan
Start by installing FormsPlugin from the Framer Marketplace or directly through the FormsPlugin website. Once added to your Framer account, its components appear in your components panel like any other Framer resource, ready to drag into projects. There is no extra app to log into while designing.
The File Upload field is part of FormsPlugin’s advanced form builder. For real client work, agencies and serious founders usually go with the Pro or Ultimate-style plan. That tier gives lifetime access, unlimited forms, and an unlimited website license, so the same plugin powers every funnel, microsite, and client project without extra per-site fees.
A plan with unlimited forms and sites matters when experiments start stacking up, such as:
A new lead magnet page with a gated download.
A separate hiring landing page requesting resumes and portfolios.
A private onboarding portal for a single client collecting assets.
All of these can reuse the same upload-ready form system instead of forcing separate tools or extra subscriptions each time.
Step 2: Build Or Open Your Framer Form
Next, open the Framer project that needs file uploads. This might be:
A careers page collecting resumes and portfolios.
A project intake form for an agency needing brand assets.
A support page asking for screenshots or log files.
If there is already a native Framer Form frame on the page, you can enhance it. If not, this is a good time to add one.
FormsPlugin works on top of Framer’s native form system, not instead of it. You still use regular Framer forms, but now you can drop in advanced fields from the plugin. For a fast start, FormsPlugin also offers pre-built templates that already include forms wired with advanced inputs. You can:
Duplicate one of these templates.
Customize copy, fields, and styling.
Plug it straight into your own project, saving setup time.
Step 3: Add The File Upload Field To Your Form
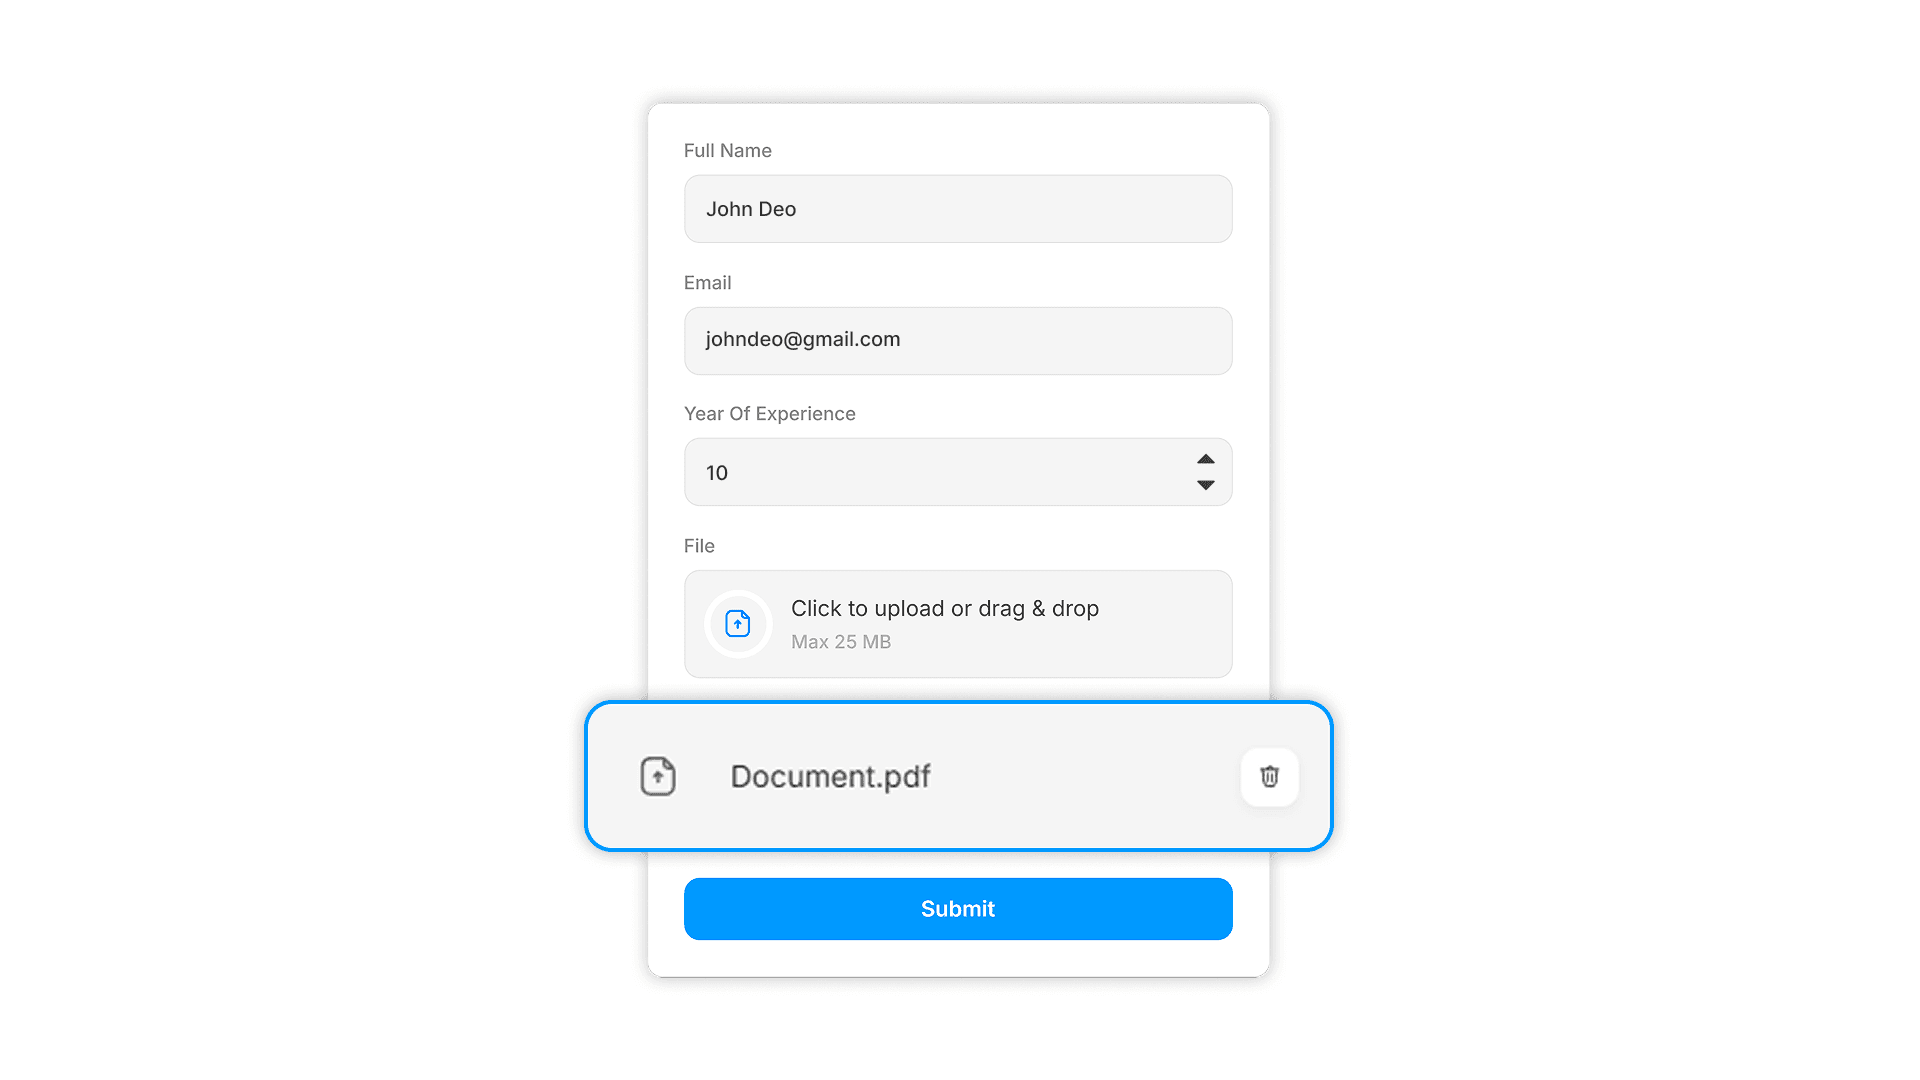
With the form selected, open the FormsPlugin components in the left panel and find the File Upload or File Uploads field. Drag it onto the canvas and nest it inside the existing form frame, just like you would with a normal text input or button. Placement is visual and intuitive.
Think about where the upload fits best in the user’s flow. Often, it comes after basic details so people know who they are submitting as before sending files. For example:
A job form might read: Name, email, short intro, then “Upload your resume.”
A client intake form might ask for company details and project scope, then “Attach project brief.”
Support forms often put “Upload screenshots” near the description of the issue, so context stays clear.
Step 4: Configure File Types, Size Limits, And Validation
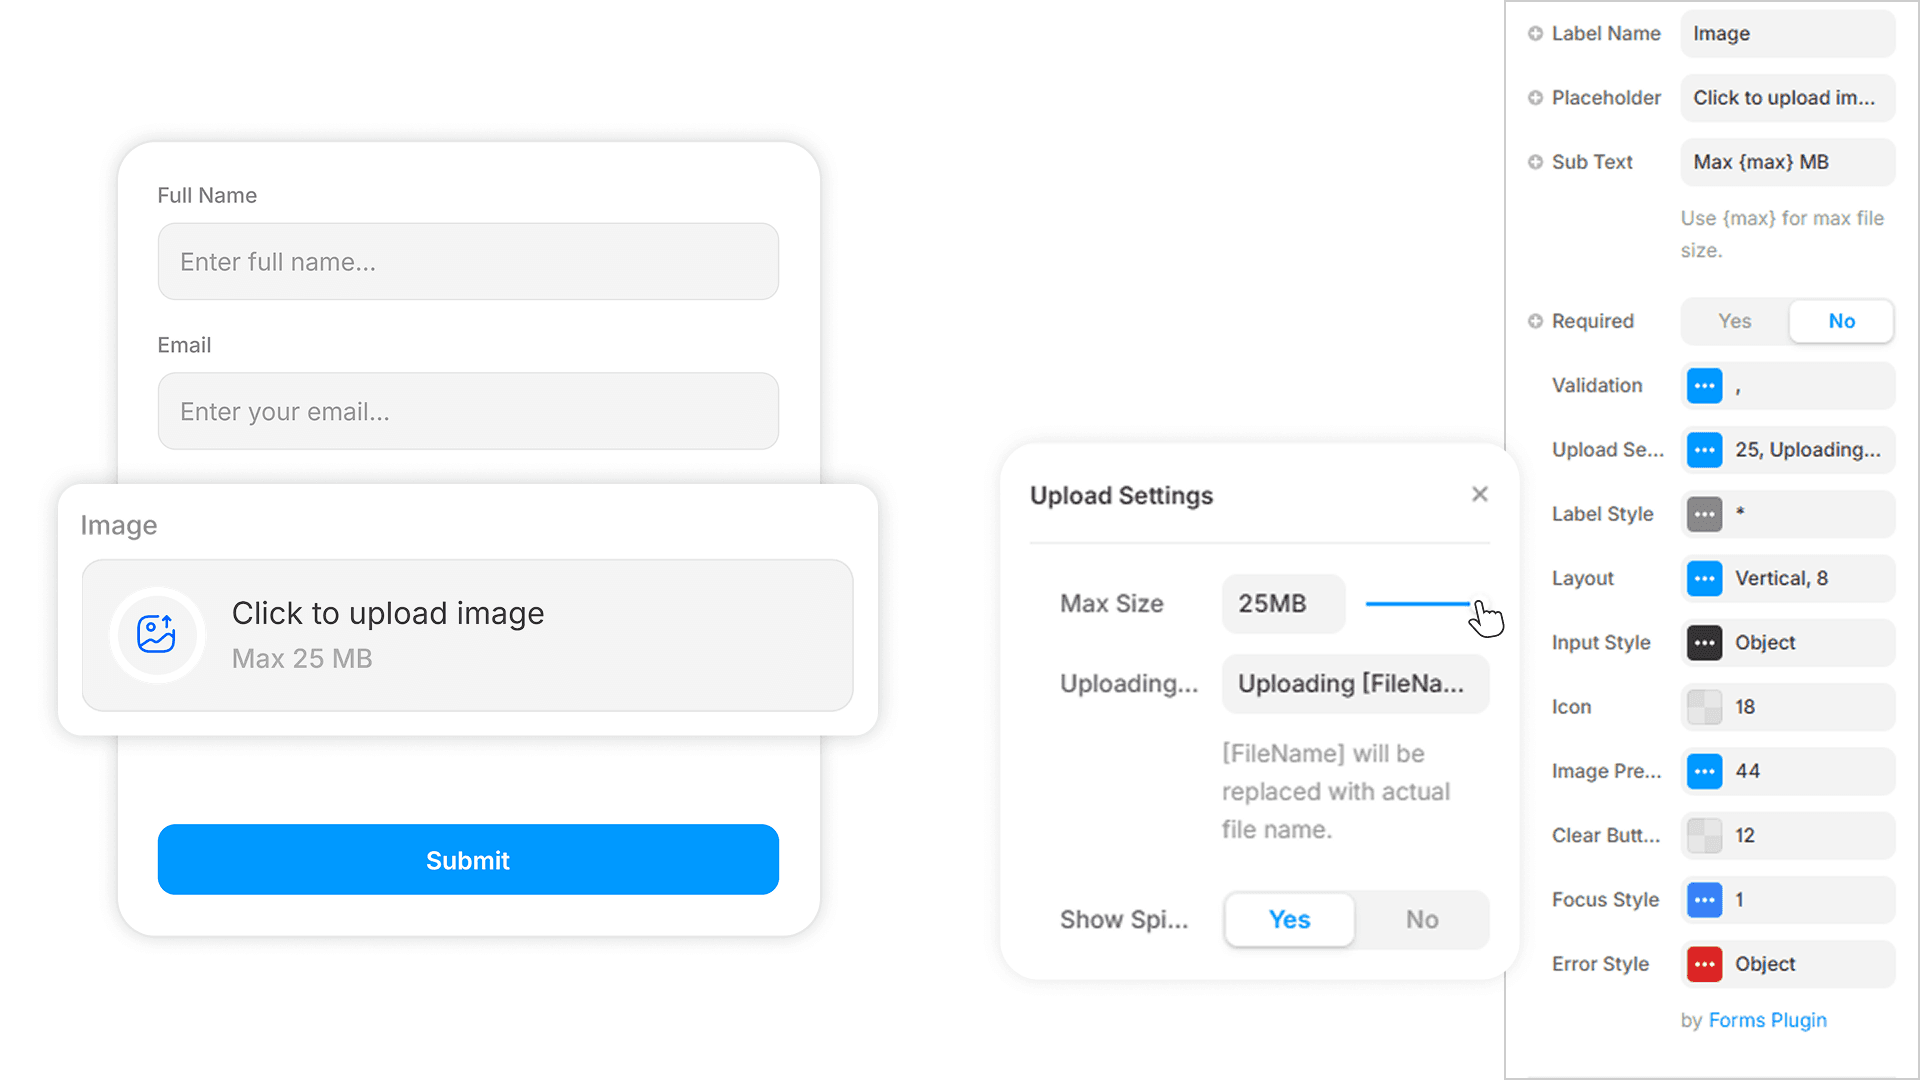
With the upload field selected, move to the properties or settings panel in Framer. Here is where framer form file upload turns from a simple field into a controlled, production-ready input. You can specify exactly which file types are accepted, such as:
PDFs and DOCX files for resumes.
PNG and JPG files for design assets and screenshots.
ZIP archives for bundled project files, when relevant.
Set a maximum file size to keep uploads fast and storage under control. For many forms, 5–10 MB per file works well. Mark the field as required if the upload is essential, like a resume in an application, or leave it optional for supporting files. Align these settings with what your team actually needs on each submission.
While you are in the panel, remember that FormsPlugin adds spam protection across forms with several captcha options. That extra layer matters once files are involved, since blocking automated junk keeps your inbox and any external storage far cleaner and easier to manage.
“Every validation rule is a quiet conversation with your user. Make it clear and kind.”
— Common UX guidance on form validation
Step 5: Style The File Upload Field To Match Your Brand
Design is where Framer shines, and FormsPlugin respects that. Treat the File Upload field like any other design element.
You can:
Update the button text so it says something clear, such as “Upload resume,” “Attach brief,” or “Upload assets,” instead of a vague “Choose file.”
Use Framer’s visual controls to fine-tune typography, colors, border radius, spacing, and hover states so the field blends with the rest of the page.
Add short helper text underneath that explains what is expected, such as “PDF or DOCX only, max 10 MB” or “Upload up to 3 reference files to help us understand your project.”
Because FormsPlugin is fully native, there are no iframe edge cases or styling walls; what you see on the canvas is what ships to the live site.
Step 6: Connect Submissions And Test The Flow
Once the upload field looks and behaves the way you want, it is time to decide where submissions go. FormsPlugin is built for automation, so your form can send submissions—including file references—to:
Email inboxes for quick review.
Google Sheets for lightweight tracking.
Zapier or Make for more advanced workflows.
This happens without custom backend work.
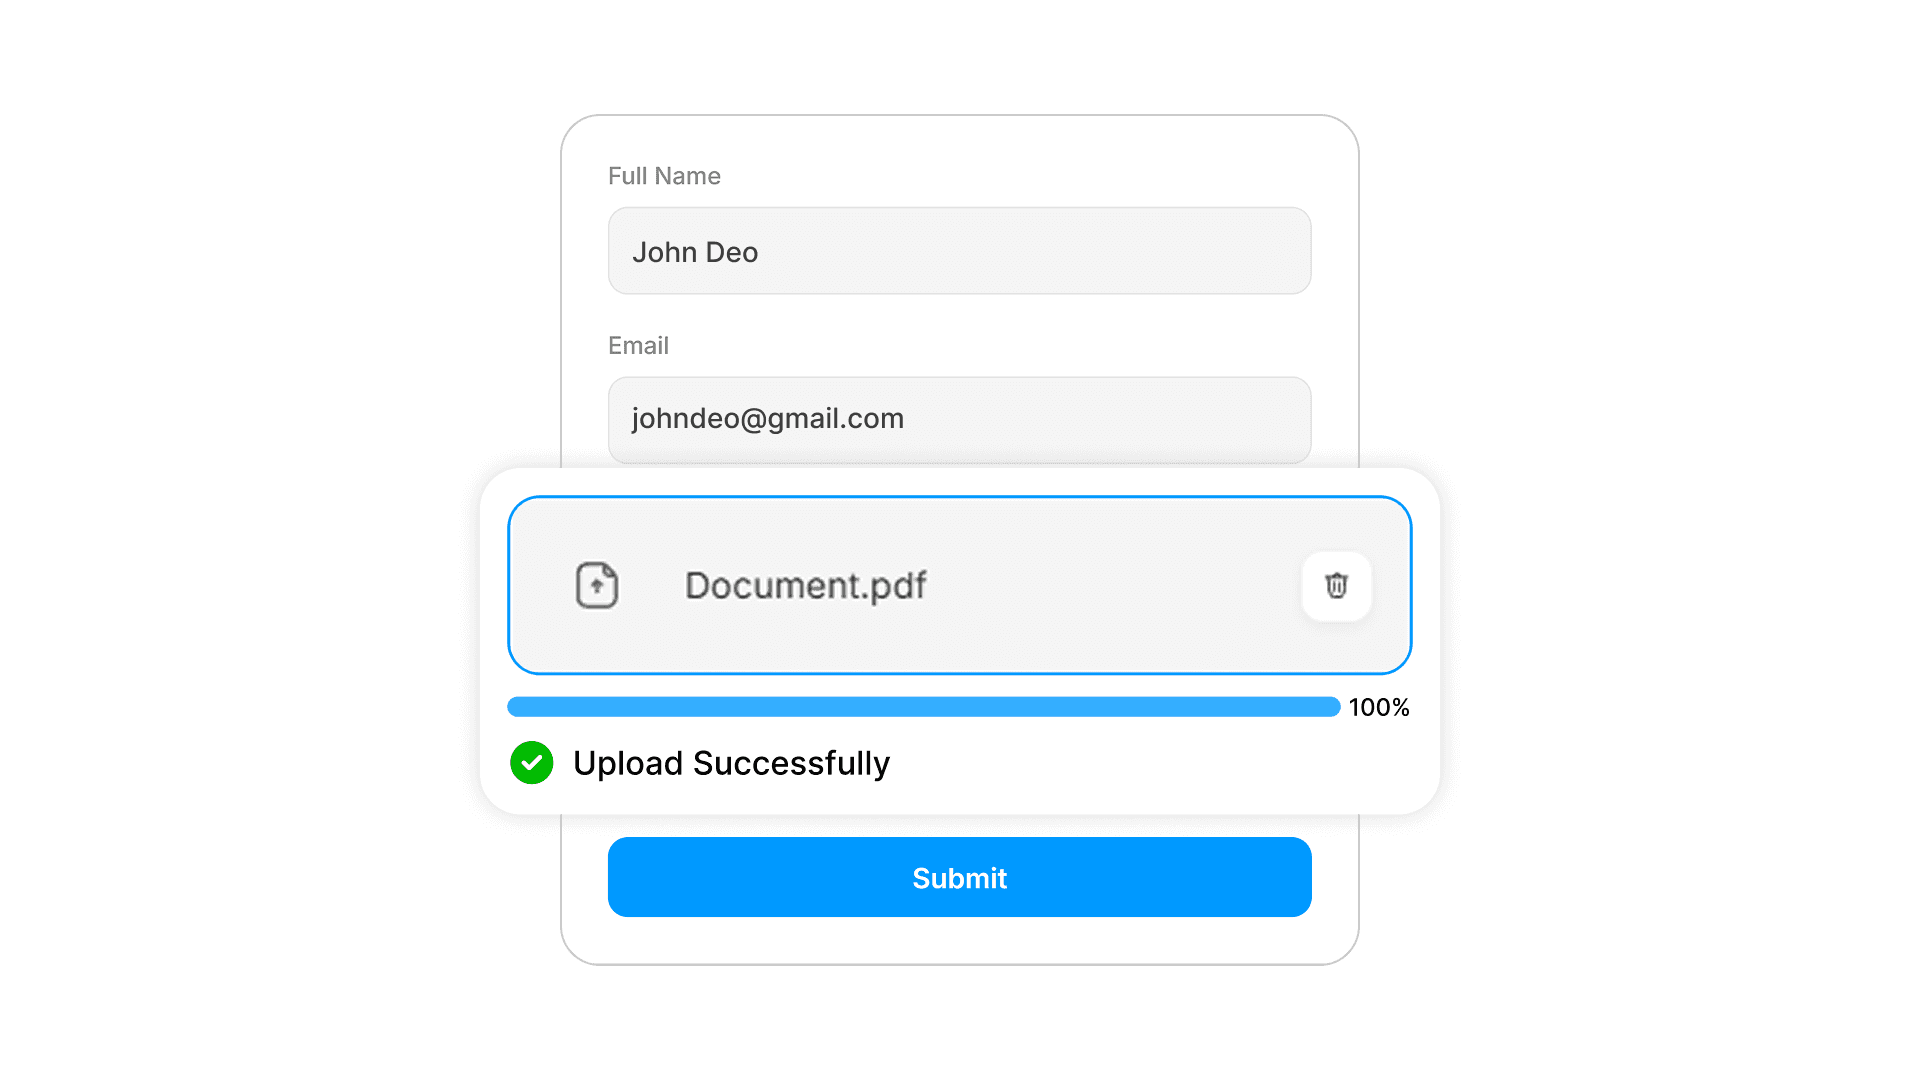
Publish the site to a test domain and run several submissions. Make sure to:
Try valid files within the size limits.
Send files that are too large or in the wrong format to confirm that error messages are clear.
Check that the received data shows file links or metadata exactly where you expect them.
Verify that your team notifications and automation steps trigger correctly.
When everything looks good, save this setup as your personal pattern for future forms so new client projects start from a proven, file-ready baseline.
Best Practices For Designing High-Converting Framer Forms With File Uploads
Once a form asks people to upload something, the stakes rise. Uploading a file takes more effort than typing into a text field, and any confusion or friction can cause people to drop off. Good UX around framer form file upload can be the difference between half-finished submissions and a steady stream of rich, actionable data.
FormsPlugin gives fine-grained control over copy, layout, multi-step flows, and logic, which makes it easier to design upload experiences that feel focused, respectful of time, and worth completing. The practices below work across job forms, client intake, and support flows.
Clarify What To Upload And Why
People are more likely to upload a file when they know exactly what you want and how it helps them. Instead of a bland label, spell out the purpose in friendly language. For example:
A job application might say, “Upload your resume (PDF or DOCX, max 5 MB) so our hiring team can review your background quickly.”
A client form could say, “Attach your brand assets—logo, guidelines, and key visuals—so we can quote your project accurately.”
FormsPlugin’s upload field makes this easy by letting you customize button labels, placeholder text, and helper copy directly in the properties panel. You can also:
Mark fields as required or optional.
Explain the impact of skipping the upload.
If skipping means slower review or a less accurate proposal, say that clearly so users can decide with full context.
Set And Communicate Constraints Clearly
Nothing frustrates users faster than choosing a file, waiting a moment, and then seeing a vague error. To avoid that, define clear constraints and put them right next to the field. List:
Allowed file types (for example: PDF, DOCX, PNG, JPG).
Maximum size per file.
Maximum number of files, if there is a limit.
Those rules should match exactly what the FormsPlugin component is validating behind the scenes. When someone does upload an incorrect file, show a friendly, specific error like “File is too large. Please upload a file under 10 MB” instead of a generic failure message.
Clear guidance before and after upload keeps support tickets down and makes the whole form feel more polished and trustworthy.
Use Multi-Step Flows To Make Uploads Feel Lighter
Long single-page forms can feel heavy, especially when they include uploads. Multi-step layouts spread the effort out and give people a sense of progress. FormsPlugin includes visual multi-step support, so you can split forms into sections like:
Personal Info
Project Details
File Uploads
Review & Confirmation
For most use cases, it works well to place file uploads in the middle or later steps. By then, the user has already invested time and understands the context, so uploading feels like a natural part of finishing the process instead of a surprise. Each step can include short, focused instructions, making it easier for people to understand what to do and why it matters.
Show File Upload Fields Only When Relevant (Logic)
Not every visitor needs to upload a file. If every version of a form shows every upload field, the layout can feel busy and overwhelming. FormsPlugin includes visual logic controls so you can reveal or hide fields based on earlier answers without writing JavaScript.
For example:
If someone selects “Report a bug” as the reason for contact, you can then show an “Upload screenshot or log file” field.
If they choose “Custom branding project,” a “Upload logo and brand guidelines” field appears.
If a candidate selects “Include portfolio,” then show “Upload portfolio PDF or link.”
Users who do not choose those paths never see those uploads at all. This keeps the form shorter for them while still collecting the right assets from the people who actually need to send them.
“Smart forms ask only for what matters to the person in front of them.”
— UX best practice applied to conditional logic
When (And Why) To Choose FormsPlugin Over Custom File Upload Workarounds
Anyone searching for framer form file upload will run into several alternatives. Some tutorials walk through adding a custom file input to a native Framer form, then sending the actual files to a storage service like Cloudinary while passing back URLs through hidden fields. Others suggest embedding third-party form builders in iframes. Both routes can work, but they come with trade-offs.
Native form plus external storage gives deep control over storage and backend logic, which can appeal to teams with strong developer resources. However, it also means:
More configuration and environment setup.
More custom code to maintain.
Ongoing work around security rules, billing, and edge cases.
Embedded third-party forms remove some of that work but often create styling challenges and UX seams, especially on mobile or complex layouts. You may run into:
Scroll issues inside embedded frames.
Design systems that do not match your Framer site.
Limited control over animations or page transitions.
FormsPlugin takes a different approach by staying fully native to Framer. The File Upload field lives inside the same canvas and styling system as the rest of the page, and everything is managed through drag-and-drop and visual settings. There is no separate builder, no iframe, and no need to handle storage or PDFs directly in your own backend.
Submissions can flow into email, Google Sheets, Zapier, or Make, where they plug into existing tools without custom backend development. For example, you can:
Send resumes from a careers page to a hiring spreadsheet.
Route new client briefs to a project management board.
Forward support attachments to a help desk system.
For most Framer designers, no-code builders, freelancers, and agencies, this path strikes a practical balance. It keeps the design process simple, makes forms repeatable across many client sites thanks to unlimited forms and site usage, and removes technical roadblocks that slow down launches. Startup founders gain reliable file handling for lead capture and onboarding without hiring a developer.
Unless file storage is a deep core of the product itself, FormsPlugin is usually the most straightforward way to add powerful file uploads to Framer forms while staying in a no-code-friendly environment.
Conclusion
File uploads change what a Framer form can do. Instead of collecting just text, a form can now gather resumes, project briefs, screenshots, and brand assets in a single submission. That richer input leads to faster decisions, fewer follow-up emails, and a smoother experience for both teams and visitors. For serious Framer projects, skipping file upload often means leaving efficiency and professionalism on the table.
With FormsPlugin, framer form file upload stops being a technical hurdle and becomes a visual task inside the Framer editor. The Advanced File Upload field slots into any native form, follows your brand styling, enforces clear rules, and works alongside multi-step flows, logic, captchas, and other advanced fields. There is no custom code to maintain and no external form builder to wrestle with.
Because FormsPlugin offers automation-ready integrations, submissions with file links can move straight into email, Google Sheets, Zapier, or Make, where they feed hiring pipelines, client onboarding, and support processes. Unlimited forms and sites mean the same setup scales across every client or brand without extra licensing headaches.
The next step is simple:
Install FormsPlugin.
Drop a File Upload field into a test form.
Send a few trial submissions to see how files appear in your workflows.
Once that small example is working, roll the same pattern into job applications, client intake, and support flows. If forms are a core part of your work across many projects, upgrading to the full, lifetime plan gives a stable, agency-grade form system you can rely on for every new build.
FAQs
Question: Can I Add File Upload To A Framer Form Without Writing Code?
Yes. FormsPlugin includes a native File Upload field that you add with drag-and-drop inside the Framer editor. All configuration happens in the properties panel, so there is no need for custom scripts, custom components, or separate form builders. You stay fully in Framer while getting advanced upload behavior.
Question: Will FormsPlugin’s File Upload Field Match My Framer Site’s Design?
FormsPlugin is built to be fully native to Framer, so the upload field styles just like any other component on the canvas. You control button labels, typography, colors, borders, spacing, and helper text using Framer’s visual tools. That makes every upload field feel like it belongs inside your design system rather than an embedded widget.
Question: Is FormsPlugin Reliable Enough For Client Projects And Production Sites?
Yes. FormsPlugin is created by Framer Geeks, a top-rated Framer agency trusted by more than 200 teams and holding a 4.9 out of 5 rating across many reviews. The plugin grew out of real client work and has been shaped by hundreds of production projects, which means its File Upload and other advanced fields are built for professional, client-facing forms that run on live sites.